
MikroTik Roaming: 802.11r/k/v, Band Steering, and Sticky Clients on RouterOS 7
How we set up multi-AP Wi-Fi roaming on MikroTik RouterOS 7 with 802.11r/k/v, band steering, and RSSI access-list rules: a real sticky-client case solved step by step.
When you deploy more than one access point at home, in an office, or in a larger building, the first requirement is almost always the same: a single Wi-Fi network you can roam across without manually switching SSID.
Getting the basic setup running is fairly easy. The problems start when you actually want roaming to work well in practice.
A client can stay associated to a far-away access point even though a much closer one is available. A phone can sit on 5 GHz at -75 or -80 dBm while a noticeably better 2.4 GHz signal is available from the same network. Or it can receive a roaming request from the access point and simply ignore it.
In this guide we walk through how we configured a MikroTik network on RouterOS 7 using 802.11r, 802.11k, 802.11v, and the steering features of the new /interface wifi stack, and more importantly how we dealt with the problems we actually ran into during testing.
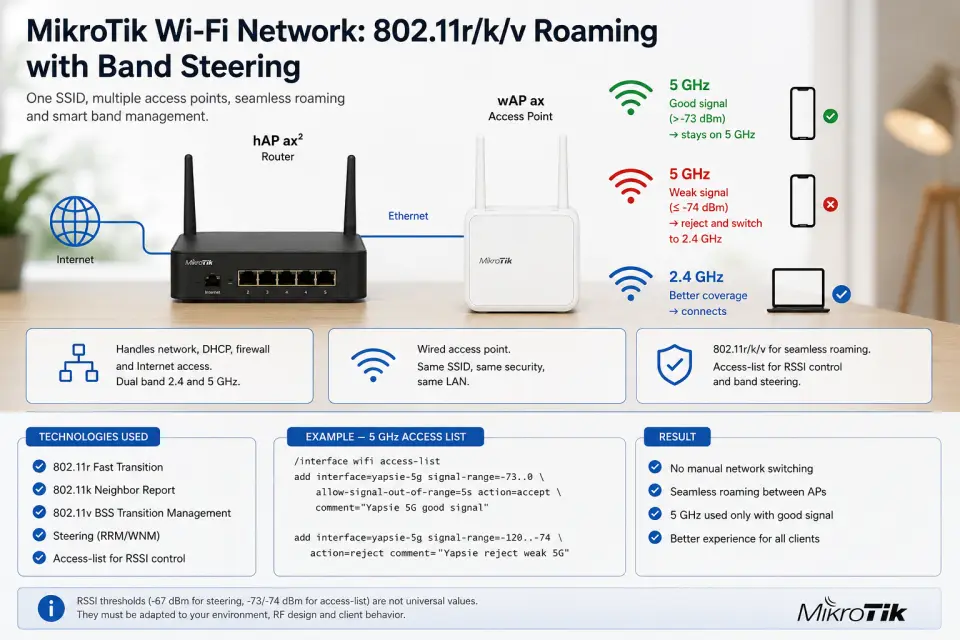
For simplicity we'll use two nodes here: a MikroTik hAP router and a wAP ax connected over Ethernet. The same setup has also been deployed on infrastructures with more than 30 nodes. With two devices, though, it's much easier to see exactly what's happening and to reproduce the configuration yourself.
Mesh, or multi-AP network?
One clarification first.
What we're describing here is often loosely called a "mesh network," but technically we're building a multi-AP Wi-Fi network with assisted roaming and Ethernet backhaul. The link between access points runs over cable, not over a dedicated Wi-Fi mesh backhaul radio.
Whenever you can run Ethernet to your access points, that's generally the better option: no radio capacity is spent carrying traffic between nodes, and every AP has its own wired path back to the LAN.
From the user's point of view, though, the desired outcome is exactly what people associate with a mesh: one SSID, and the ability to move between Wi-Fi cells without ever touching a setting.
The topology
The example setup is deliberately simple:
Internet -> hAP -> Ethernet -> wAP ax
Both devices broadcast:
- SSID:
Yapsie - Bands: 2.4 GHz + 5 GHz
The router handles DHCP, routing, firewall, and internet access. The wAP essentially works as an access point and LAN bridge.
It's important not to accidentally create a second network on the wAP with its own DHCP or NAT: every client needs to end up on the same LAN regardless of which AP it's associated with (if these concepts aren't familiar, our networking fundamentals guide on IP and subnetting covers the basics).
Don't trust wifi1 and wifi2
One of the first things we checked during setup looks trivial, but it can cause real confusion.
On two different MikroTik devices, wifi1 and wifi2 don't necessarily map to the same band. In our case:
hAP:
wifi1= 5 GHzwifi2= 2.4 GHz
wAP:
wifi1= 2.4 GHzwifi2= 5 GHz
/interface wifi print
So commands copied blindly from one device to another would end up touching a different radio entirely. Before configuring anything, check SSID, band, frequency, and master interface.
When you're working across multiple MikroTik models, it's much safer to reason about the actual radio than about the wifi1 or wifi2 name.
One SSID
For roaming, we created a shared SSID, Yapsie, broadcast on both 2.4 and 5 GHz from both access points.
During testing we used virtual interfaces, keeping the previous networks temporarily active. That's a convenient approach when you're working on a network already in production: it lets you experiment with the new roaming setup without immediately touching the live SSIDs.
On the hAP, the virtual interfaces were created on their respective masters:
/interface wifi add master-interface=wifi2 name=yapsie-2g configuration.ssid="Yapsie" security=sec-home disabled=no
/interface wifi add master-interface=wifi1 name=yapsie-5g configuration.ssid="Yapsie" security=sec-home disabled=no
On the wAP the masters were reversed:
/interface wifi add master-interface=wifi1 name=yapsie-2g configuration.ssid="Yapsie" security=sec-home disabled=no
/interface wifi add master-interface=wifi2 name=yapsie-5g configuration.ssid="Yapsie" security=sec-home disabled=no
The interfaces obviously need to go into the LAN bridge. In our case:
/interface bridge port add bridge=bridge-LAN interface=yapsie-2g
/interface bridge port add bridge=bridge-LAN interface=yapsie-5g
The bridge name depends on each installation's own setup.
Matching security everywhere
For roaming to work correctly, SSID and security configuration need to be consistent across every BSSID.
We used WPA2-PSK/WPA3-PSK.
Something interesting happened to us right during this phase: after some changes related to Fast Transition, some iPhones started showing "incorrect password" or "unable to join the network," even though the password was correct.
Re-entering the passphrase and reapplying the security profile realigned the configuration, and the devices went back to authenticating normally. So it's worth not automatically blaming the client when a password error suddenly shows up right after a change to FT or to the security profile.
802.11r: Fast Transition
802.11r shortens the time a device needs to re-authenticate when it moves from one BSSID to another on the same network.
On the new RouterOS Wi-Fi stack we enabled Fast Transition:
security.ft=yes
security.ft-over-ds=yes
This needs to stay consistent across every AP participating in the same network.
802.11r doesn't decide when to roam, though. Its job is mainly to make the transition faster once the client has already decided to move. That distinction matters.
802.11k, 802.11v, and steering
RouterOS lets you use RRM and WNM to help clients choose access points.
We created a steering profile:
/interface wifi steering add name=steer-yapsie rrm=yes wnm=yes transition-threshold=-67 transition-threshold-time=3s transition-request-period=5s transition-request-count=unlimited
and attached it to the Yapsie interfaces.
Technical note:
-67dBm is the value we used in this specific installation, not a universally recommended MikroTik threshold. It needs to be chosen by observing the actual network you're working on.
When a client's signal stays below -67 dBm for at least three seconds, RouterOS treats it as a roaming candidate and can periodically send it an 802.11v BSS Transition Management Request.
The client is then informed that better alternatives exist. But here's the key detail: the access point does not decide roaming. The client does.
A BSS Transition Request is a suggestion. The device can accept it or simply ignore it. And that's exactly where we ran into the most interesting problem.
The sticky client on 5 GHz
During testing we took an iPhone and walked progressively farther away from the access point.
From the registration table we could follow BSSID, band, and RSSI in real time:
/interface wifi registration-table print
The phone got down to roughly -75/-77 dBm on 5 GHz. At that same spot, the 2.4 GHz radio on the same SSID had a noticeably better signal.
We expected a fairly quick handoff to 2.4 GHz. It didn't happen. The iPhone kept sitting on 5 GHz.
Roaming behavior doesn't depend purely on RSSI: the client also factors in Wi-Fi technology, band, and the characteristics of the candidates. In practice, a device can stay stuck to 5 GHz far longer than you'd expect just by looking at the dBm numbers.
First attempt: forcing the transition
RouterOS exposes transition-time. So we tried:
transition-time=20s
The idea seemed sound: if the client stays below the threshold too long, it gets deauthenticated after 20 seconds.
It technically worked, but it didn't fix the problem.
Every 20 seconds the iPhone got dropped. It immediately looked for Yapsie again. And reconnected to 5 GHz again.
So we'd turned a sticky client into a sticky client that disconnected every 20 seconds. Not exactly an improvement.
We reverted to:
transition-time=unlimited
This way RouterOS keeps suggesting the transition without periodically forcing a deauthentication.
The fix: block a 5 GHz signal that's too weak
At that point we changed approach.
Instead of trying to convince the iPhone to leave 5 GHz, we set a threshold below which that specific 5 GHz BSSID should no longer be considered usable at all.
RouterOS lets you do this through /interface wifi access-list.
We used two rules, applied only to the yapsie-5g interface:
/interface wifi access-list add interface=yapsie-5g signal-range=-73..0 allow-signal-out-of-range=5s action=accept comment="Yapsie 5G good signal"
/interface wifi access-list add interface=yapsie-5g signal-range=-120..-74 action=reject comment="Yapsie reject weak 5G"
The first rule accepts the client when the signal is between -73 and 0 dBm. allow-signal-out-of-range=5s avoids reacting to a very brief signal dip.
The second rule rejects the 5 GHz association outright when the signal is -74 dBm or weaker.
Having both rules matters. During testing we initially added only signal-range=-73..0 with action=accept. The phone kept showing up anyway at -75/-76 dBm.
The reason is that an accept rule only defines what happens when a client matches it. On its own, it doesn't act as a blanket rejection for everything outside that range.
Once we explicitly added the reject rule for -120..-74, the behavior changed immediately.
The test
We initially scoped the reject rule to the iPhone's MAC address only, to avoid affecting other devices during the test.
The rule's match counter started climbing right away:
match-count=8
That confirmed the phone kept trying to associate to the weak 5 GHz signal, and RouterOS was actually rejecting it.
A few seconds later the registration table showed Yapsie on 2ghz-ax at around -65 dBm. The phone had finally moved from roughly -75/-77 dBm on 5 GHz to roughly -65 dBm on 2.4 GHz.
We then ran the opposite test: walking back toward the access point. With no further forcing, the iPhone dropped 2.4 GHz and reconnected to 5 GHz on its own, this time at around -55 dBm.
That was exactly the behavior we wanted: when 5 GHz is good, let the client's natural preference for that band stand; when it gets too weak, stop the device from stubbornly hanging on to it.
-73/-74 dBm is not a universal threshold
Don't treat -73 and -74 dBm as magic numbers.
They're values that worked well in our specific installation, used here to illustrate the method. On a different network the right threshold could be -70, -75, or -78 dBm. It depends on AP density, transmit power, the layout of the space, interference, the devices in use, and the actual link quality.
Too high a threshold triggers excessive roaming. Too low a threshold lets clients drag along a connection that's already unusably degraded.
So it's worth observing the network first, and choosing the threshold afterward.
Soft steering and a hard limit
In the end we kept two separate mechanisms.
The first is steering:
transition-threshold=-67
transition-threshold-time=3s
transition-request-period=5s
transition-request-count=unlimited
transition-time=unlimited
As the signal degrades, RouterOS starts suggesting to the device that better candidates exist. That's the "soft" behavior.
The second layer is the access list on 5 GHz:
-73..0      -> accept
-120..-74   -> reject
That's the hard limit beyond which we don't want a device continuing to use that particular 5 GHz cell.
The first mechanism aims for natural roaming. The second kicks in when the client doesn't cooperate.
Diagnostics: watch what the client is actually doing
One of the most useful things during setup was to stop judging roaming by looking at the phone's Wi-Fi icon.
RouterOS lets you see what's actually happening. The core command is:
/interface wifi registration-table print
/interface wifi registration-table print where mac-address=XX:XX:XX:XX:XX:XX
/interface wifi access-list print detail
/interface wifi steering print detail
/interface wifi monitor wifi1 once
/interface wifi monitor wifi2 once
The registration table shows interface, SSID, MAC address, uptime, activity, RSSI, authentication, and band. The match-count field on access-list rules is particularly useful for checking whether a rule is actually being hit. The radio monitor lets you check frequency, state, peers, and the TX power actually in use.
DFS: why 5 GHz can vanish
During setup we also ran into the "DFS channel availability check (1 min)" message.
That's not an error. On some DFS-subject 5 GHz channels, the access point has to run a Channel Availability Check before it can start transmitting. During that window the radio can be temporarily unavailable.
Changing configuration, switching channel, or restarting the interface can therefore mean a short wait before 5 GHz comes back up. Worth knowing, because otherwise it's easy to mistake a normal CAC period for a problem with the change you just made.
Transmit power
Another common mistake is trying to fix any coverage issue by simply cranking up power.
RouterOS enforces the limits of the configured regulatory domain. In our case, configuration.country=Italy.
Turning up AP power isn't always a fix for roaming, either. An access point that's too "strong" can actually make sticky-client behavior worse: the device keeps hearing the far AP and delays handing off to the next cell.
In a multi-AP network, getting cell overlap, channel plan, and roaming thresholds right is usually more important than chasing maximum power. The starting hardware matters here too: if you're still choosing an access point, our guide to picking a Wi-Fi router covers the main standards and specs worth weighing.
Radio channels
With multiple access points you also need to avoid turning every node into a transmitter on the same channel.
On 2.4 GHz, where available spectrum is limited, planning matters a lot. On 5 GHz you have more room to work with, but DFS and wider channel widths come into play too.
In a network with many nodes, channel planning becomes part of the RF design itself. Sharing the same SSID doesn't mean every AP has to transmit on the same channel; quite the opposite, usually.
From two to more than 30 nodes
The setup described here uses two access points because it makes the mechanism easy to follow.
With many nodes the underlying principle doesn't change: same SSID, same security policy, same LAN, consistently configured 802.11r/k/v, planned channels, properly overlapping radio cells, steering, and rejection of clients with insufficient RSSI.
What changes is the need to centralize and standardize the configuration. On larger deployments, CAPsMAN, provisioning, shared profiles, and real RF planning all come into play.
Thresholds also need more careful evaluation at scale. A home with two APs and a building with thirty are very different radio problems, even when they run the same roaming protocols.
What we actually learned
The most important part of this experience wasn't turning on 802.11r, k, or v. It was checking what the clients were actually doing.
802.11k helps a device learn about available candidates faster. 802.11r speeds up authentication during the handoff. 802.11v lets the network suggest a better BSSID.
But the roaming decision still largely belongs to the client. And that's exactly where a lot of the problems people describe as "the mesh doesn't work" actually come from.
In our case, the network was correctly suggesting roaming, but the iPhone kept preferring a 5 GHz signal that had already dropped to around -76 dBm. Forcing a disconnect every 20 seconds didn't help: the phone just came back to the same 5 GHz radio.
The fix turned out to be simpler: let the device choose freely as long as the connection is reasonable, but block association to a 5 GHz cell once the signal becomes objectively too weak.
The end result was exactly what we wanted from the start: 5 GHz when the signal is good, 2.4 GHz when it offers better coverage, and roaming between access points with no manual network switching.
Before you wrap up: back it up
Once the configuration works, take a backup before you keep experimenting.
We kept both the binary backup and the text export:
/system backup save name=wifi-working
/export show-sensitive file=wifi-working
The first lets you restore the device quickly. The second is extremely useful for reading the configuration, comparing it, and pulling out individual sections without necessarily restoring everything.
Careful: show-sensitive includes sensitive information in the export. Store that file with the same care you'd give to your network passwords.
In a Wi-Fi setup that's finally working the way it should, taking both backups costs a few seconds and can save you plenty later.
Editorial note: this guide uses two nodes for clarity; the methodology described has also been tested on infrastructures with more than 30 nodes. The RSSI thresholds mentioned (-67 dBm for steering, -73/-74 dBm for the access list) are values verified in this specific installation, not universally recommended MikroTik thresholds. The configuration was built and verified on RouterOS 7's new /interface wifi stack.
← All articles